Or
How I got myself into and out of trouble when outnumbered 3:1 in Rome: Total War.
I had been playing this game for the first time for several hours sometime last year or the year before (summer 2012? they all kind of blurrily smudge together these days). I needed the break and this was a great outlet.
I played through the tutorial and then was cut loose to do what I wanted. I had fought my way to a particular city that, if I took fast enough, would earn me some bonus coin. But my army was in bad shape. After many encounters, my army of nearly 1000 had been reduced to 253. I didn’t think I had enough troops to take the city by force and reinforcements were going to be en route for a while.
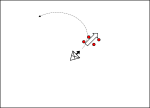
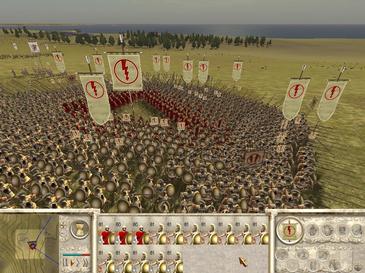 This is not my army, just an example.
So, instead of attacking outright, I laid siege, starving them out. It would take time, but there would be no bloodshed.
It did take time; a long time, but I was patient and more friendly troops were getting closer each turn. Before my reinforcements arrived, the siege broke and they surrendered. Alas, it was too late for the bonus, but at least I hadn’t had to take my busted up army into battle. And I hadn’t had to kill anyone.
When you take a city, you are given three choices.
1) Occupy
2) Enslave
3) Raze
I chose option one. I always do. I always assume that, given time and patience, I’ll bring them along. I always just want a populace to join my nation in its purest form, griping and all. I thought they’d be pissed for a while but I’d just have to wait that out. After all, in Civilization, they just stop working until you can get enough troops into the city. That or a weak unit will pop up around the city to try to liberate it. Not being terribly good soldiers, they can be dispatched in short order from the safety of the city.
No, they just needed time and some demonstration that life would be good with me. So I just hunkered down and waited, planning to spend a little money to fix the place up when I got some. Did I mention I was falling asleep the whole time? Anyway, I figured once reinforcements arrived, I could lock down the city and instill some order. Then I could go to sleep.
That didn’t happen. After what seemed like a short honeymoon, they threw my little army out on its ass (I had no idea they could even do that), and then immediately surrounded me with partisan militia. There was no getting out of the encounter.
It was the wee hours of the night and I had been playing this game much much too long. I glanced at the numbers and saw that they only had 150 troops to bring to this fight. I didn’t care what their disposition was. I outnumbered them nearly 2:1.
(An interesting option in Total War, if you don’t like getting dirty in the fights and just want the political and strategic aspects of the game – the way they do for most of the battles in Game of Thrones – you could just have the battle auto-calculated for you. I know; to hell with that.).
I didn’t need my brain. I just needed to surround them on a few sides, leaving something open so that they had a direction in which to run away (instead of having no choice but to stand and fight me united), then kill them in retreat. I planned to use everything that I had to win swiftly and decisively. Nothing fancy, not much careful maneuvering, just hammer and anvil top to bottom. Here’s how I did it.
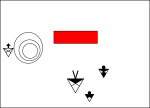
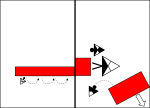
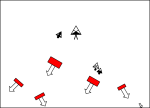
My disposition
I don’t remember the exact numbers for each unit but their physical sizes here are about what they were in the game so you can kind of tease out the ratios.
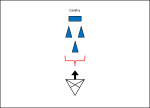

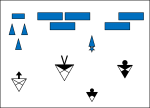
Cavalry: My light armored cavalry was pretty beaten up but I still had one healthy heavy cavalry unit. I opted to put these in a hammer formation, with the heavy cavalry as a rectangular hammer head and the most damaged light unit at the back. I put them on the left since there was a hill ahead on the left. I figured they might be able to scoot around behind it or up it and charge down with either surprise, or gusto, or both.
Pikemen: I only had two wounded units of pike left. I paired each with a(n?) Hastati.
Hastati: I made these javelin-hurling swordsmen the local hammers to the pikemen’s anvils.
Archers: I only had one archer unit remaining and I put it right in the center where they could cover everything. They weren’t enough to make a serious difference (which is why they don’t show up as a characteristic on the final diagram), but they are enough to be a nuisance to the enemy, so I include mention of them here.
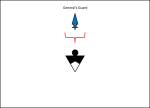
Command: I placed the General and his guard center and slightly right in order to influence both anvil units. I figured, if I was so motivated, I could use them to cut off the enemy’s retreat.
(Some interesting rationale went into assigning the different titles to these representative characters from the Cell system. Ask me about them sometime, if you’re curious.)
I assigned each collection of units a hotkey and wasted no time getting into it. Here’s roughly how it went down.
The Fight
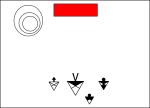
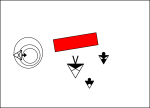


I immediately sent my cavalry left around a small hill. It was my hope that the none-too-dumb AI would assume that I was planning to come around the other side. If they were going to respond to my cavalry, they’d fixate on that space. Rather I would quickly charge my cavalry up the back side of the hill and then back down into the enemy’s right (vice behind). I marched the rest of my forces forward, using a road as a guide, spreading out as we advanced in case they had archers.
They ignored my cavalry (apparently they were too far away to see when they first took off), and focused on the advancing infantry. After the cavalry arrived behind the hill, I gave them a short rest and then brought them up the back of the hill. I then charged the cavalry down to attack the exposed flank as I planned.
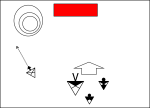
The enemy attempted to redirect its focus to the cavalry that was chewing on their right leg when I told the infantry to charge, no longer in danger from first contact. They were quickly surrounded by a giant C, arrows killing those crushed in the center. They broke faster than I expected and those who could do so ran.
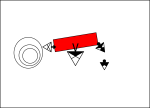
I left the infantry where they were and chased down the fleeing infantry with the cavalry, easily cutting them down one unit after another. As the last of the enemy fled the area, I wondered why the game was still going instead of declaring me victorious.
I left the last few surviving enemy to run on their own and turned wide left to see if I’d missed a significant unit (sometimes I forget to check the tactical map). Then I swung my view back behind my probably bored but steadily pursuing cavalry to see my infantry a very long distance away pretty much in the same disorganized state that I left them in (oh, but the times you wish that you had intelligent subordinate commanders in these games…). Right behind them, marching on line, was a HUGE formation of enemy soldiers. One could be excused for swearing, so I did.

Somewhere in the back of my mind, the picture of the pre-combat screen came crisply into focus. My mind’s eye scanned the image. Just below the part showing 150 troops was another part showing… ah, yeeeah… 600 additional troops… that whole “these guys are going to be late to the dinner, but they are still coming to dinner”-thing. So… my infantry is standing there with their backs turned to an overwhelming number of enemy getting very close and my cavalry is halfway across the map.
Decision time
Do I stay or do I run? Running is a perfectly acceptable tactic and I seriously considered this as well as maybe two other options. I just wasn’t sure, at this range, if I could actually escape.
What else could I do? I attacked.
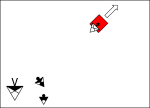
Knowing that it would take a while, I ordered my cavalry to attack the right rear of the enemy and then focused on my infantry. I immediately realized that running away would have been a bad idea. They had two different kinds of units: pikemen and cavalry. Those cavalry would have run my infantry down and killed them in retreat… exactly the way I had just done.
I sent my large infantry to charge into the left-most enemy unit. I sent the small infantry to protect the larger unit’s right by forming a filleted L. Any enemy trying to get at the larger unit’s right from close range would get hung up on the smaller unit’s pikes and then be killed on their own flanks by Hastati. I sent the General’s cavalry to attack the back and left of that same unit.
This effect created a local numerical superiority that broke the first enemy unit quickly and sent them running. Rather than pursuing them, I used this same model on the next unit, breaking their will similarly. I did this over and over again. When the units that had fled collected themselves and decided to return to the fight, they were rewarded with the full attention of the infantry and general’s cavalry again, whereupon they broke for good and left the map. I’m pretty sure this is where my general was killed.
You might be wondering why they didn’t use that huge number of troops to surround me. There was a distinct benefit to my cavalry starting out so far away. It meant that, as they came closer to the infantry, they could crash into the back of each enemy unit on the way in, forcing them and nearby units to stop and direct their energy toward the fast-moving cavalry.
Once this enemy had been well-distracted, I had the cavalry break contact and move on, attacking the back of the next unit that was attempting to close with the infantry. I did this over and over again as well, to good effect, allowing my infantry to do its work. It was complicated as hell to juggle these different activities, but the principles were simple.
Once the main cavalry arrived, I put the two infantry units online and chewed up everyone and everything nearby. Then I stood them down. I then used the combined cavalry forces to thrash anyone who wasn’t in flight until everyone was either dead or had fled the map.
Victory.
76 of my guys survived that. That’s like starting with a full platoon and ending up with a squad (a squad would be the first rank of thirteen troops in this picture of a platoon).
![]()
But my guys killed 704 of the enemy and drove the remaining 46 from the battle area. That’s like starting with an over-strength company and ending up with a squad (… just count out thirteen survivors in this group…).

When I sent my 76 soldiers back into the city, I was again given the choice about how to proceed.
1) Occupy
2) Enslave
3) Raze
This time I burned it to the ground. I haven’t played since.
What did I learn?
• I re-learned that you can never assume that the little guy is helpless.
• I learned that my diamond cavalry method (heavy cavalry at the front), which I only went with because the light cavalry was so beaten up, works great against virtually all targets. The heavy cavalry makes initial contact (in some direction other than the front) and the light cavalry flood around the sides. The third light cavalry protects the rear of the attackers or dives in to support the engaged heavy cavalry without putting themselves in much danger. I was able to use this tactic over and over without modification to great effect and at little cost, even against the enemy’s cavalry.
• I learned that, while this initial plan and my response to the threat were effective, if at any point they had gotten their shit together and created a serious barrier, then my cavalry would have had to ride far around. The remaining enemy forces could have then surrounded my infantry (chasing the General’s Guard with a few cavalry units) and destroyed them.
• If they had deployed sooner, the fighting would have taken longer to start, but my infantry would have been much tougher to rescue. I suppose, if they had deployed later, they would have arrived sooner and I wouldn’t have known until they were already engaged with my troops.
• If they had shown up with a few archers, I had little defense for that since the only unit that could have helped (the General’s guard) was covering the infantry’s left and intercepting routed enemy that was trying to return to the fight. Yeah, archers would have sucked.
The point is, I was successful (in a Pyrrhic sense) only because the enemy was stupid and I was lucky. And that is sobering.
I’ll play again sometime after I finish this degree and life normalizes a bit.
-CG